 |
At item level there are user-definable fields in seven groups. you decide which fields are in use and in what order , which fields can be updated, and which copied. Some of these fields relate to general item data. Many of the fields correspond directly to subfields in the MARC21 Format for Bibliographic Data and the MARC21 Format for Holdings Data.
After choosing this option an overview screen with the seven groups is presented:
In order for a group to be visible on the Item Detail screen, and for setting the parameters Data to be entered and Data to be modified, you must set it to be In use = Yes.
: To set a group to In use select the group and click this button. The following form will be presented:

Note:
The In use/active check box is only available if none of the fields for this group are selected in the Data to be entered and Data to be corrected parameters (see below).
: Select a group and click this button to modify the elements of that group. You are presented with the overview screen listing the elements of the selected group:

Double-click the field you want to modify:

· Enter the Wording you want for the field
· Check the In use/active check box
· Check the Mandatory check box if you want this field to be filled in for every item
· Check whether this field is copied when you use the Copy Item function
· Select a Data type from the drop-down box. The default is Text. Caution: if you want to use the Combo option contact Geac for advice.
· You can enter a default that will be entered for each new item
· Cache Format Pattern is any valid Cache Object Script pattern
· Select an option from Automatic format conversion (not mandatory)
· Select a Standard Validation Test if applicable (You can ignore this option)
· If relevant you can an select an Authority List which is linked to the authority list behind the field
The fields selected on the Data to be entered form are shown when a new item is added. The group names and the field names displayed here are those previously defined In use in the Item Definition Settings.
When you choose this option the following form is presented:
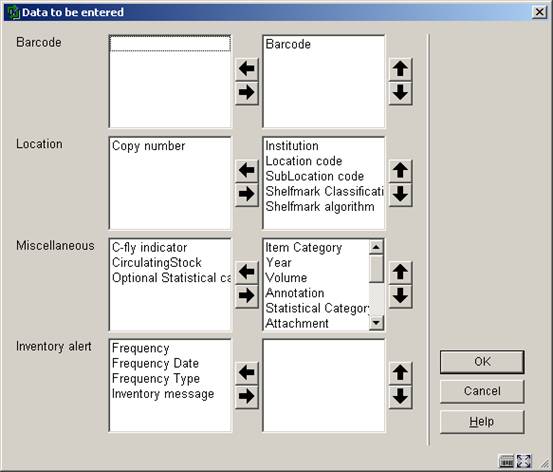
· Select the fields on the left hand side
· Click the Right arrow to enter them for display.
· Use the Up and Down arrows to determine the order for display.
The groups and fields selected on the Data to be corrected form are shown when updating a item record. The group names and the field names displayed here are those previously defined In use in the Item Definition Settings.
When you choose this option the following form is presented:
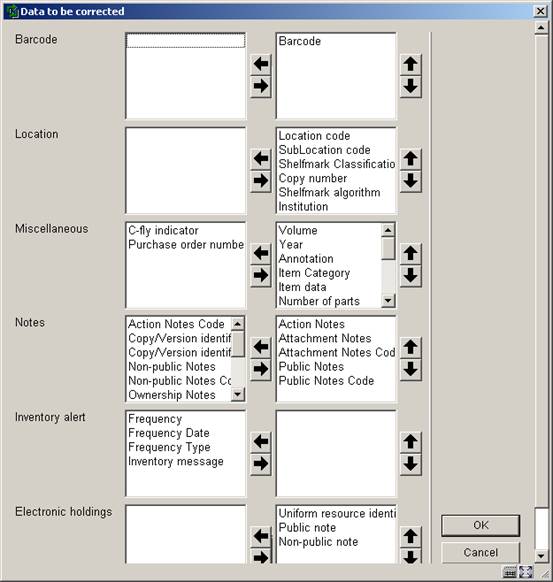
· Select the fields on the left hand side
· Click the Right arrow to enter them for display.
· Use the Up and Down arrows to determine the order for display.
The groups and fields selected on the Data to be displayed form are shown when looking at an item record in various places in the system on the Item detail screen. The Electronic Holdings group combines all selected fields into a one line display for each Electronic Holding attached to the item. The group names and the field names displayed here are those previously defined In use in the Item Definition Settings.
When you choose this option the following form is presented:

· Select the fields on the left hand side
· Click the Right arrow to enter them for display.
· Use the Up and Down arrows to determine the order for display.
The fields selected on the Data to be entered in Acquisitions form are shown when a new item is added in AFO 222, Receiving with barcode. Your selections must contain barcode in the Barcode group, location, sublocation and at least one other shelfmark field in the Location group and item category in the Miscellaneous group. The group names and the field names displayed here are those previously defined In use in the Item Definition Settings.
When you choose this option the following form is presented:
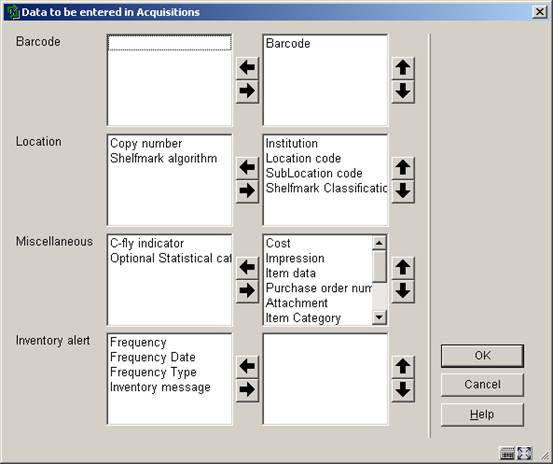
· Select the fields on the left hand side
· Click the Right arrow to enter them for display.
· Use the Up and Down arrows to determine the order for display.
Item authority lists are the list codes that you can use when creating or modifying various aspects of the item data. Whenever a drop down select list appears, it is utilising an item authority list. The Item authority lists are created by Geac. The codes and wordings that populate the lists must be created by each site. Some lists will be populated by the data from a conversion process.
If an authority list exists for a field you can utilise it by selecting the Combo or Combo/Text option when defining the data type for the field in Item definition settings:
After choosing this option you are presented with a form. Choose the list you want from the dropdown box:

You are then presented with an overview screen containing the codes already defined for this list:

: Select a code from the list and click this icon to modify its properties.
: Select a code from the list and click this icon to delete it from the list.
: After selecting this option the following input form is displayed:
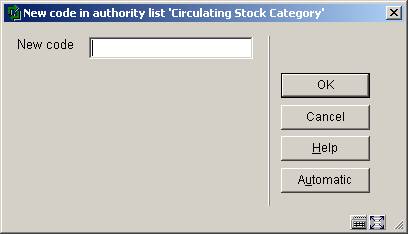
· Enter a code and click , or click the button.
- The code can be numeric, an alphabetic mnemonic code or free text. You can use upper and lower case letters.
The Record editor window is displayed:
· Enter the wording you want to appear, for each language:
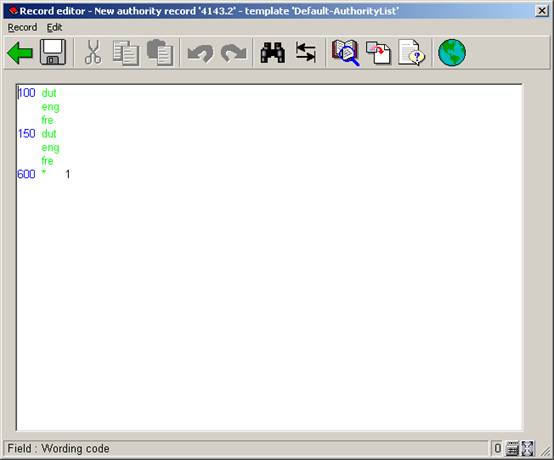
- The value entered in the 100 tag for the various languages is the wording used in the select list.
- The value entered in the 600 tag indicates whether to display the value in the select list or not. Only 1 (yes) or 0 (no) is valid.
· Click the icon
· Click the icon
This option determines which type of notes are displayed in Loans, Returns, Renewals and Item transfer. After choosing this option the following form is displayed:
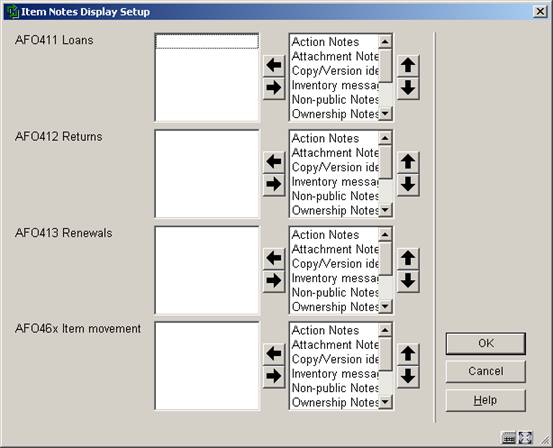
· Select the fields on the left hand side
· Click the Right arrow to enter them for display.
· Use the Up and Down arrows to determine the order for display.
You can define a shelfmark algorithm that will automatically add a shelfmark to new items when they are added to the system database. The shelfmark is generated from data in defined tags/subfields in the bibliographic record. The algorithm also defines what transformations should be done on the raw data and how many characters of transformed data are to be extracted into the shelfmark.
An algorithm contains the following fields:
· Code:
· Wording (eng, dut and fre):
· Element/Group profile: this is one of the defined element/group profiles on the system and tells the system where to get the raw data for your shelfmark. The profile MUST exist for all formats currently defined on your system. Only Element type profiles are displayed in the drop-down list.
· Separator: define the character that separates the classification portion of the shelfmark from the cutter/item number of the shelfmark in the raw data. If no character is defined, it is assumed that only the classification portion of the shelfmark will be defaulted.
· Transformation: a multiple-choice drop-down list containing choices such as: remove all blanks, remove articles, transform to uppercase. The transformation(s) is applied to both the classification portion and cutter/item number portion of the string retrieved by the element/group profile
· Extract characters for Classification portion (x,y): character positions to extract from and to (1,4 extracts characters 1 to 4 from the classification portion of the transformed string).
· Extract characters for Cutter/Item number portion (x,y): character positions to extract from and to (1,6 extracts characters 1 to 6 from the cutter/item number portion of the transformed string)
· Local subroutine: the name of a local subroutine that can be called to get the shelfmark data instead of using the Element/group profile.
· Alternative algorithm: a valid shelfmark algorithm selected from a drop-down list. This algorithm is used only if the retrieval of the element/group profile information returns a data value of “”. Only Element type profiles are displayed in the drop-down list.
The system has been released with one system-defined Shelfmark algorithm. The system defined shelfmark algorithm !Default, makes use of the !DefaultShelfmark profile to default shelfmark information out of the call number tags from the bibliographic record.
For MARC21/B databases this is the 082 tag.
After choosing this option you are presented with an overview screen showing the algorithms already defined:

: Click this icon to create a new shelfmark algorithm.
: Select an item from the list and click this icon to modify the selected shelfmark algorithm.
: Select an item from the list and click this icon to create a new shelfmark algorithm by copying the existing one.
: Click this icon and a form will be presented:

Select a shelfmark algorithm from the dropdown list and enter the ID number of a bibliographic record, preceded by the database number. The result will be displayed:

: Select an item from the list and click this icon to delete the selected shelfmark algorithm.
If entered, this is a valid Shelfmark algorithm (selected from a drop down list) and it will be defaulted into each new item record and then used to generate a shelfmark for the new item record.
You can specify which of your defined locations are available as a pickup location for borrowers to collect reserved items from. You will want to exclude certain locations from the list, such as your “technical” locations (Cataloguing, Acquisitions, Bibliographic Services). You may also want to exclude locations such as your mobile libraries, Schools library, Stacks, or indeed any of your library locations.
You can alter the wording of each location if you wish. This wording is what appears as ‘Available for pickup at…….’.
Note:
The wording for the Pickup location in the WebOpac is defined in the location manager in AFO 461.
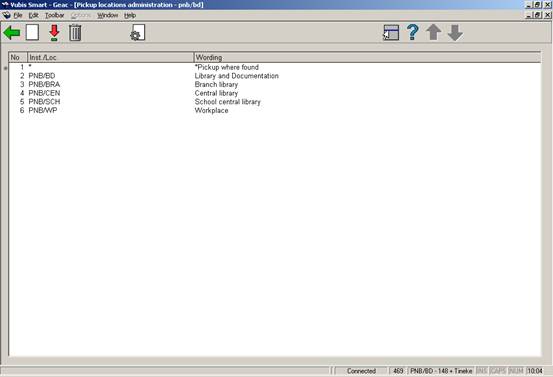
After choosing this option you are presented with an overview screen containing the codes already defined for this list:
: Select a code from the list and click this icon to modify its properties.
: Select a code from the list and click this icon to delete it from the list.
: After selecting this option the following input form is displayed:

Enter a valid Institution/Location combination and wording and click .
: After selecting this option the following input form is displayed:

This allows you to default the pickup location (as presented in AFO 421) to a fixed location, regardless of the placement location. You still have the option to change this to any other defined pickup location for each reservation.
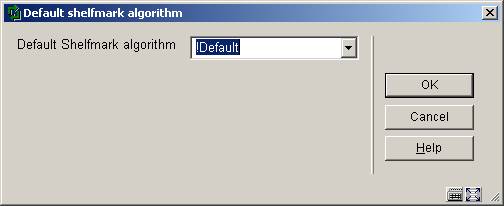
After choosing this option, the following form is presented:
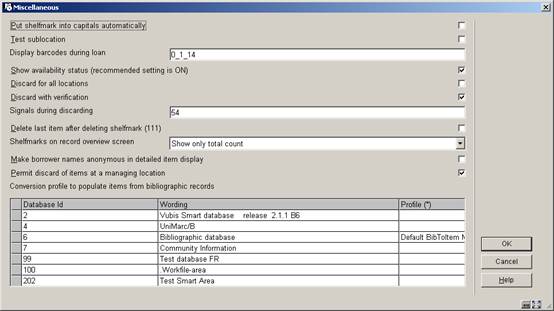
Put call number into capitals automatically : If your library does not differentiate between call numbers in capital (upper-case) letters and call numbers in small (lower-case) letters, all call numbers can be converted into capital letters, which makes entering data easier.
Note:
This parameter only applies to the call number part of the shelfmark. You can use AFO 469 Item Definition Settings to enable any transformations on any of the shelfmark components.
Test sublocation: This parameter determines what happens when you want to add a new sublocation.
· Untick the checkbox means you can add a new sublocation without any validation
· Tick the checkbox means the sublocation must already be defined in AFO 613. A list of locations is then available under a List button. Ticking the checkbox also makes the sublocation field mandatory when adding new shelfmarks.
Display barcodes during Loans: This parameter refers to item barcodes and has three components, separated by an underscore:
· a normalize
- 0 do not transform the barcode to uppercase
- 1 automatically transform to uppercase
· b 1st character of the barcode that must display
· c last character of the barcode to be displayed.
Example barcode AF0001238964
Set parameter to 0_6_12. This does not normalize, displays the barcode as 1238964 (characters 6-12).
Show availability status: recommended setting is ON
Discard for all locations: This parameter applies to items that are on shelf in the owning location.
· Untick the checkbox – only items for your location may be deleted
· Tick the checkbox - items for any location within the institution can be deleted
Discard with verification: This specifies whether an additional message is displayed when you delete an item.
· Tick the checkbox to display a message
Signals during discarding: This parameter is used to specify the messages that are displayed when you delete items.
· 1 Last copy of title
· 2 Last item deleted for this for institution
· 3 Last copy of material type
· 4 Last item deleted for this location
· 5 Last item for this shelfmark.
Enter the numbers with no separation. It does not matter in what order the numbers are entered, the system always evaluates 12345.
Note:
Only one message is displayed if multiple criteria are met. The lowest number message defined in the parameters is the one that will be displayed.
If the relevant message is not defined in the parameter then no warning message is given.
The alert is displayed, then a confirmation request.
Example
The parameter is set to display messages 135. The item being deleted is the very last copy on the system. Only alert 1 Last copy of title is displayed.
Delete last item after deleting Call number (111): Check this box to have the system automatically delete the last item when you delete the call number in AFO 111.
Shelfmarks on record overview screen: Here you can choose the way shelfmarks are displayed on the record overview screen:
·
- display all shelfmark info for current institution
- display a summary per institution: the number of shelfmarks per institution is shown
- display a summary per location: the number of shelfmarks per location is shown
- display only the total number of shelfmarks
Make borrower name anonymous in detailed item display: This parameter controls the display of the borrower name in AFO 423 Edit items.
If this parameter is set to Yes, all borrower names will be displayed as “*****”. The option is there to protect borrower privacy.
Note:
The borrower barcode is still displayed, so that you still have the ability to access the data, if needed. It is also still possible to directly access the borrower record of the last borrower.
Conversion profile to populate items from bibliographic records: this option allows you to link a conversion profile to each active database on your system. This is then used to default bibliographic data into newly created item records. Use the F8 (function key 8) or type the characters ?L in the Profile column to get a dropdown list of valid conversion profile names. Select one of the profiles in the list and press to link a conversion profile to a database. This conversion profile takes precedence over any other defined defaults for the item record.
Items are flagged to indicate the date at which they can be released for issue (circulation). This feature requires a 'release date' to be set in the bibliographic MARC record (this will be in a locally defined tag/subfield). It also requires a new parameter at the material type (item category) level which defines the holdback period ('number of days') that new items of this material type need to be held back. When a new item is added to the system, the system calculates the new 'date to circulate'. This field is the date before which the item is not allowed to be checked out. This date is calculated from the 'release date' + holdback period and is stored in each item record. In the bibliographic record does not contain a release date, the date to circulate is not calculated.
After choosing this option you are presented with the following form:

· Use this option to set holdback periods (in days) based on Institution/location/item category.
·
In case there are morre than 15 item categories, there will be a button om to go to the next screen.
·
The button allows you to go directly to a specific item category.
These parameters are part of the Circulating stock feature. The circulating stock function allows libraries to automate the movement of stock from one branch to another on a regular basis. Item selection is controlled via a set of rules defined for each library, which govern which items are selected and when. Items selected are gathered into lists which can then be used to relocate the items on mass to the new location. Once at the new location, the items may then be selected as part of another list for further relocation at some point in the future. In brief, the rules allow you to define a set of locations from which items may be moved and, if so, to which location. For each rule, the key parameters are how long the material has been at its current location. Rather than process the items in small “drips” - a few DVDs here, two Fiction items tomorrow and so on – the rules are used according to “schedules”. This allows you to bundle together material so that it is processed at “known” times – for example, you might move circulating Biographies every Friday, but Music CDs only on the 3rd day of each month.
These categories can be added when creating new item records. They can also be added as part of an order (without further item information needing to be defined).
After choosing this option you are presented an overview screen with codes already defined:
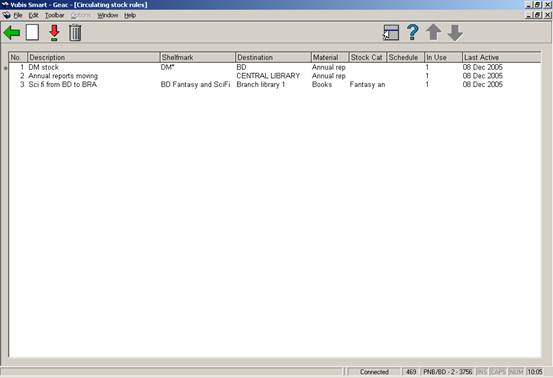
: Select a code from the list and click this icon to edit the selected rule.
: Select a code from the list and click this icon to delete the selected rule.
: After clicking this icon you are presented with the following form:
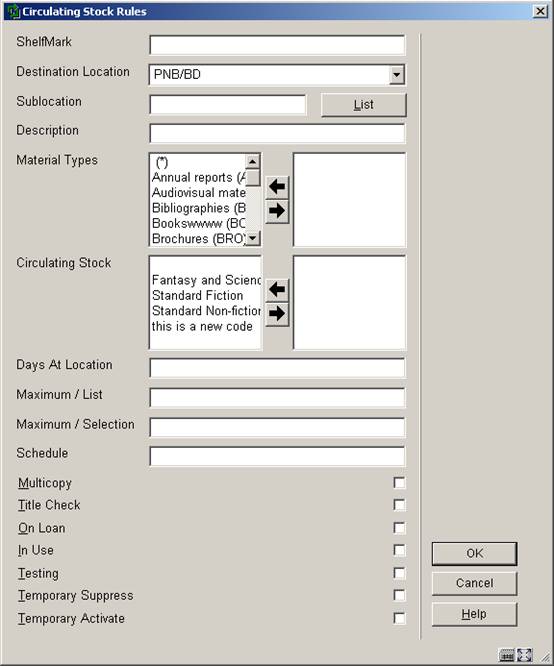
Shelfmark: The Shelfmark field allows for a very precise definition of locations if required, using the standard Vubis format for the display of shelfmark (i.e. Location [Sublocation] call number). If the call number part of the field is defined, then it may be of the form
· 123.45 only Dewey number 123.45
· 123.4* i.e 123.4 to 123.4999999
· 123-456 i.e. 123 to 456.9999999
Only right truncation is available – an asterisk (*) in any position other than the right hand one will be considered to be 'data' rather than a wild card.
Destination location: The destination location is defined in the Destination and sublocation fields.
Sublocation: See above.
Description: This is just an optional description of the rule- it might be used to annotate the rule, or group related rules together.
Material Types: the item material type (optional).
Circulating stock: (optional.)
Days at Location: Number of days that a given item must have been at the current location before it can be selected. You can enter either a number or a range of days, e.g. 100-200. This means an item will not be selected until it has been 100 days at the current location, nor after it has been 200 days at the current location.
Maximum / List: items on a list may, of course, need to be selected from the shelves. In order to maintain a manageable number per list, you may set a maximum.
Maximum / Selection: allows a maximum number of items to be selected using this rule on a given run. For example, when starting to use this function, there may be very many items which haven’t been moved from branch to branch; it may be necessary to ‘stagger’ the movement to get things rolling. This parameter allows you to limit the number moved from one branch to another at any one time.
Schedule: This defines the period at which this “rule” should be used – e.g. is it to be applied on the first day of the month, every Friday and so on.
· Format 1 - Empty field
- This means the rule should always be used.
· Format 2 - Contains information made up of 4 parts.
- specific day(s) of month
- day(s) of week
- week(s) of month
- month(s) of year.
Format 2 fields are separated by a vertical bar character and may contain the follow values
· 1 snn s = specific day nn = actual day of month (numeric value between 1 and 31depending on month)
- Example s01 day 1 of each month
· 2 dn d = day of week n = actual day of week (numeric value between 0 and 6)
- Example d1 Day 1 of each week (i.e. Monday)
· 3 wn w = week number of month n = actual week number (numeric value between 0 and 5)
- Example w3 Week 3 of each month
Note:
Week 1 is the week that starts with the first Sunday of the month. eg if the first Sunday is the 4th the days 1, 2 and 3 are considered to be in week 0
· 4 mnn m = month nn = actual month of the year (numeric value between 1 and 12)
- Example m7 Month 7 of each year (i.e. July)
Each field above will also allow multiple values to be held and these values must be separated by the comma character.
Each field above can be used to define a range where the start and finish values are inclusive and separated by the dash character.
Examples
· | d3 | w2 | m1
· | | w3 | m3
· s20 | | | m3
· s1,3 | | | m1,6
· | d1-4 | |
· S31 | | |
In the above six examples the rules will be set active as follows :-
· line 1 – active on the 3rd day of week 2 in month 1 (i.e. Wednesday, week 2 in January)
· line 2 – active for week 3 in month 3 (i.e. Every day of week 3 in March)
· line 3 – active on the 20th day of month 3 (i.e. active on March 20th)
· line 4 – active on the 1st and 3rd days of months 1 and 6 (i.e. 1st and 3rd of January and June)
· line 5 – active on days 1 to 4 inclusive for each week (i.e. Monday -> Friday)
· line 6 – active on the 31st day of each month (Note that this rule is only active for months containing 31 days, e.g. January, March etc)
Multicopy: if this is checked, then all copies of a title which meet the criteria are transferred, otherwise only one copy of a title will be moved per selection run.
Title Check: conversely, if set, this checks to see if a copy of the title is already present at the destination location.
On Loan: if not set, then only copies “on the shelves” are considered. If set, then such items will moved to the new location. Since these are not available for retrieval, they will be assigned to the new location at run-time; and a “ship to” message will be generated when they are returned to the original location.
In Use: If checked then this code can be used.
Testing: The testing option allows you to specify that this rule is being tested. In this case, items and lists are selected as normal but an extra warning is made if trying to actually transfer the items selected by this rule.
Temporary Suppress: allows you to override the scheduled periods for this rule, and is useful for testing.
Temporary Activate: See above.
There is a new background routine available to recalculate item costs. Item costs can either be appreciated or depreciated based on age. The library identifies the amount (percentage) of depreciation/appreciation by linking item statistical category patterns to a depreciation/appreciation format.
If you use this feature, Item optional fields 19 and 20 will be used to store the Last date depreciated/appreciated and the original cost of the item respectively. In AFO 469, the Last date depreciated/appreciated (internal format) should be added to the “Data to be displayed” but should not be in the “Data to be entered/corrected” since you should not change this date yourself. It is set by the system when the system depreciates/appreciates the item costs.
This background program runs automatically to recalculate item costs. The actual item cost field is modified so that all processes that use this cost will use the depreciated/appreciated cost.
The initial cost of an item is held in the item’s optional field 20 in the same format as the item cost field. The background program expects to see the full cost of the item in the item’s optional field 20. It calculates the depreciated/appreciated cost and loads it into the item cost field. When the item’s optional field 20 does not contain the full cost, the full cost is taken from the item cost field. This full cost is written to the item’s optional field 20 and the depreciated/appreciated cost is written to the item cost field.
If you choose to use the item depreciation/appreciation feature, then when an existing item’s cost is edited in AFO 423, make sure that you edit the full cost in the item’s optional field 20. The full cost is written into this field the first time the program is run. If you choose to modify the item cost field, it will be overwritten by the process the next time the process is run.
Item costs held in the charges to a borrower are not changed. This means that the depreciated/appreciated item cost is used at the time the bill or fine is processed and will not be modified after that time.
After choosing this option you are presented with an overview screen listing the codes already defined.

: Click this icon to add a new format. You will be presented with the following form:
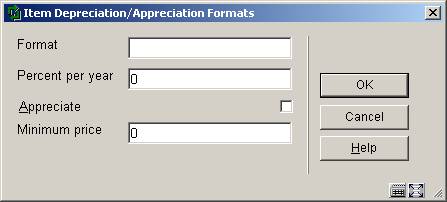
Format: validation checks for duplicates. The Format field may only be entered for a new format.
Percent per year: This validation checks that there are no decimal places and that the amount is between 0 and 100. The value represents a percentage (i.e. 10 represents 10 %).
Appreciate: if not checked then the item cost is depreciated. If checked, the item cost is appreciated. The default is to depreciate the item cost.
Minimum price: The minimum cost is entered without cents. The minimum cost should be greater than 0. The depreciated/appreciation cost is rounded up to the nearest euro / dollar / pound. If doing price appreciation, the Minimum price field is ignored.
Where the statistical category of an item does not allow it to be identified as one of the formats defined in the Depreciation/appreciation formats (e.g. AF, AN or JR), the item uses the Default format (defined in Modify properties) to determine the depreciation/appreciation percentage and minimum price. If no default is defined, the item is not depreciated at all.
: Select an existing code and click this icon to modify it.
: Select an existing code and click this icon to delete it. If this format is already in use by the Depreciation/appreciation table or assigned as the default format, it cannot be deleted.
: this option allows you to assign one of the existing depreciation/appreciation formats as the default to use when a format cannot be determined from the contents of the item’s statistical category. The system displays a dropdown list from which you are allowed to either select a default or leave it blank. It also allows you to specify that the age of an item is determined solely by the date that the item is added on your system. Alternatively, you can allow the age to be determined from an appropriate date in the bibliographic record. After clicking this icon you will be presented with the following form:

Select a format (as defined in the option Item depreciation/appreciation table)
The Depreciation/appreciation table is set up as a list of pattern matches that correspond to values in an item’s statistical category. The pattern match is used to determine which Depreciation/appreciation format to use to determine the percentage and minimum price. The pattern is defined either by listing all of the characters allowed, or by Caché pattern matching.
After choosing this option you are presented with an overview screen listing the codes already defined.

: Click this icon to add a new format. You will be presented with the following form:

Format: This is a dropdown list of the Depreciation/appreciation formats defined on the system. . The Format field may only be entered for a new pattern.
Pattern format: You may choose either
· Specify each character
- Each character in the code is specified, separated by |. If a character may have several values, separate them with a comma. * is used to indicate that any value may match in this character position.
· Pattern matching.
- This uses the Caché pattern matching rules
Pattern: The pattern textbox is where you enter the details of your pattern. If an item’s statistical category matches the defined pattern, the Format defined in the first field is used to determine the depreciation percentage.
For the example above, any items with statistical category equal to 00200 or 00400 match to the JR format which, in turn, means that the price for these items is depreciated 10% each year to a minimum price of 7.00.
The system checks to make sure that you have not defined overlapping patterns in any of the existing entries when you click OK. You can see the details of the overlap by using the Test button. The Test button will show you which statistical codes match your pattern. It will also show if there are any overlaps.
The test for overlaps compares the statistical categories that match your pattern with the statistical categories that match other patterns. If addition statistical categories are defined later, it is possible that an overlap may occur then.
: Select an existing code and click this icon to modify it.
: Select an existing code and click this icon to delete it.
Example:
In the first example, a statistical category of 00600, 00700, 00800 or 00900 matches to the AF format. In the second example, the blank in digit 3 means that any value in that third position of the statistical category is valid. Any statistical category matching the pattern 01?00 (where ? = digit from 0 to 9) also matches to the AF format.

Multipart/serial defaults are set up at the system level and are used to create default type of holding information.
After choosing this option an input screen is displayed:
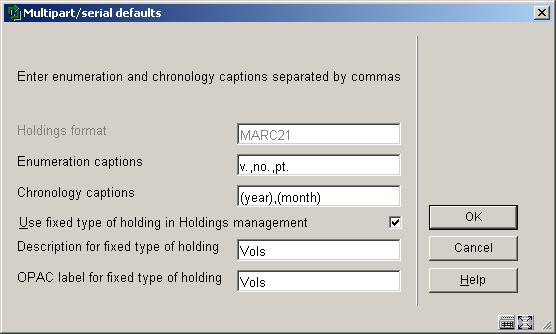
Holdings format - is display only and contains the holdings format (UNIMARC or MARC21) that is in use by the system. This cannot be changed once the system is installed but it is possible to non-interactively assign a different holdings format to one or more specific databases.
Enumeration captions – are used to default caption information when creating a new type of holding during the Holdings maintenance (AFO 111) workflow process. You should define a caption for each level of enumeration that you want to use. A caption will normally print as a prefix to the actual enumeration value. This is done according to the punctuation rules set out in the holdings standard (i.e. Z39.71). If you do not wish to have a caption print as a prefix, simply enclose the caption in “(“ “)” or “[“ “]”. Make sure that you include the “.” as part of the defined caption (i.e. v. not v).
Chronology captions - are used to default caption information when creating a new type of holding during the Holdings maintenance (AFO 111) workflow process. You should define a caption for each level of chronology that you want to use. A caption will normally print as a prefix to the actual chronology value. This is done according to the punctuation rules set out in the holdings standard (i.e. z39.71). If you do not wish to have a caption print as a prefix, simply enclose the caption in “(“ “)” or “[“ “]”.
Example
If you have the March 2005 issue of a publication numbered 18:3, the system will display the numbering (enumeration and chronology) of the issue as v.18:no..3(2005:MAR). This example is based on the punctuation defined in the Z39.71 standard.
Use fixed type of holding in Holdings management – if set, the system will automatically create a type of holding and publication pattern (bypassing the Type of holding form) in Holdings maintenance using the values in the corresponding Description, OPAC label, Enumeration and Chronology fields. This is the simplest way to enter your multipart holdings. If you wish to be prompted to enter descriptions and OPAC labels for type of holdings on your multipart records in AFO 111, leave this field unchecked.
Description for fixed type of holding – the description defaulted into the description field for type of holding records automatically created by the system.
OPAC label for fixed type of holding - the OPAC label defaulted into the the OPAC label field for type of holding records automatically created by the system.
After choosing this option you are presented with an overview screen listing the codes already defined.
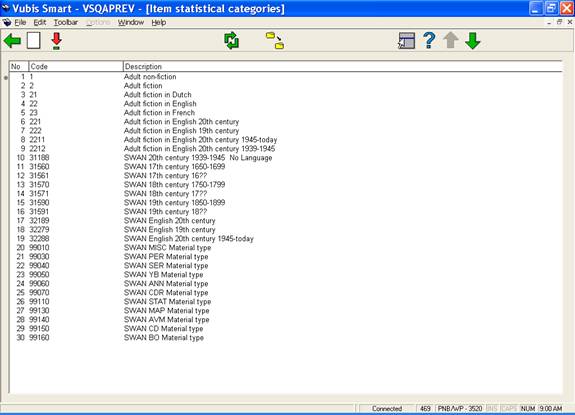
: choose this option to add a new category. An input form will be displayed:

Statistical category - The code must be unique. Valid entries contain a combination of characters A-Z, numbers 0-9 only. Punctuation, lowercase characters, space and characters with diacritics are not accepted as valid codes. Maximum length for the category code is 40.
Description – Descriptive wording for the statistical category. Punctuation, diacritics and spaces are allowed in the description. Maximum length for the description is 150.
: select a code and then this option to change the description. The input form is similar to the one described above.
: choose this option to browse quickly through a long list of codes. An input form will be displayed:
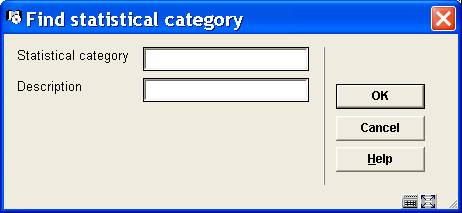
This option will display the screen containing the first occurrence of the text entered.
Enter a code or part of a code into the Statistical category to find the first occurrence of this string as a code.
OR
Enter text into the Description field to find the first occurrence of this string used in the description field.
Note
If there is an entry in the code and the description, the code portion will take precedence in the result presented.
: This option globally replaces the selected statistical category with the replacement category selected from the drop down list.

The process will check all items on the system and replace the statistical code as specified for the item statistical category. This process can be used to delete a code which is no longer in use by reassigning the current statistical categories to a new value. The process can be executed while the system is active. A messsage will be displayed:

Once the processing has been completed, the original statistical code is removed from the list of defined statistical categories.
· Document control - Change History
|
Version |
Date |
Change description |
Author |
|
1.0 |
March 2006 |
creation |
|
|
2.0 |
May 2006 |
updates for release 2.4.1 build 16 |
|
|
3.0 |
September 2006 |
updates for release 2.4.1 build 17 |
|
|
4.0 |
November 2006 |
merged in changes for release 2.4.2 serials maintenance updates |
|
|
5.0 |
March 2007 |
minor modifications |
|